Overview of Simulating RoadRunner Scenarios with MATLAB and Simulink
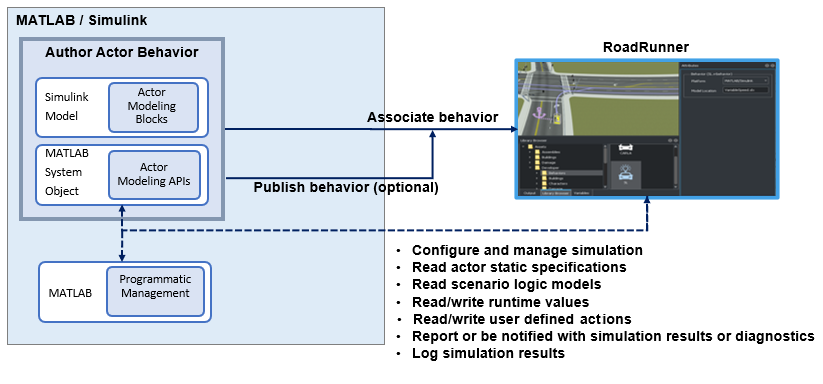
This topic describes workflows to create actor behaviors in MATLAB® or Simulink®, associate the behaviors with graphical actors in RoadRunner Scenario, start the scenario simulation in RoadRunner, and log simulation results for further analysis. RoadRunner is an interactive editor that enables you to design scenarios for simulating and testing automated driving systems. Automated Driving Toolbox™ provides a flexible framework for simulating RoadRunner scenarios with actors modeled in MATLAB and Simulink. In this framework, you can configure actors, define their behaviors, or create observers for scenario-level analysis:
Actors represent dynamic entities in a RoadRunner scenario, such as vehicles or pedestrians.
Behaviors define the logic that controls how an actor moves or reacts during simulation. You can author behaviors using a MATLAB System object™ or a Simulink model and associate those behaviors with actors in RoadRunner scenarios.
Observers are special scenario-level analysis components which can read scenario states without modifying them during simulation. Unlike behaviors, observers exist only within MATLAB or Simulink and are not recognized by RoadRunner. The purpose of observers is to allow for visualization and runtime analysis of simulation data with custom computations such as detecting when vehicles exceed a speed threshold or get too close to each other.
This table outlines the roles of behaviors and observers, its purpose, workflow steps and implementation options:
| Simulation Role | Purpose and Workflow Steps | Getting Started Examples |
|---|---|---|
| Observer |
Use observers to only read scenario simulation states without modifying them and then perform runtime analysis of simulation data in MATLAB and Simulink
| Simulate RoadRunner Scenarios with Observers Modeled in MATLAB or Simulink |
| Behavior |
Use actor behaviors to control actors during the simulation and also read the simulation states.
|
After setting up an observer or an actor behavior, you can simulate the scenario using the RoadRunner user interface, or control simulations programmatically from MATLAB or Simulink. You can also log simulation data, inspect simulation results from the log, and replay the scenario simulation using the saved simulation log.
To follow these workflows, you must connect RoadRunner and MATLAB. This topic provides basic instructions for creating this connection; for more detailed information, see Connect MATLAB and RoadRunner to Control and Analyze Simulations.
These workflows assume that:
You have a RoadRunner license and the product is installed. For more information, see Install and Activate RoadRunner (RoadRunner).
You have a RoadRunner Scenario license and the product is installed. For more information on the fundamentals of the product, see RoadRunner Scenario Fundamentals (RoadRunner Scenario).
You have created a RoadRunner project folder. For more information, see RoadRunner Project and Scene System (RoadRunner).
You have created and saved a scene and a scenario file for your project,
MyExampleSceneandMyExampleScenario, respectively. For more information on simulating a scenario see, Explore and Simulate a Simple Scenario (RoadRunner Scenario) .
Author RoadRunner Scenario Observers Using MATLAB System object or Simulink Model
You can define observers for your RoadRunner scenario to retrieve scenario data during runtime for visualization and analysis. You can author observers in MATLAB using a System object, or in Simulink using models.
The following sections summarize the key steps involved in authoring, adding, and simulating observers in RoadRunner.
Author Observer in MATLAB
This example shows the mySysObserver
System object that represents an
observer to view the number of vehicles in the scenario crossing a specified
threshold velocity. In this observer implementation, the simulation begins by
retrieving the list of actors in the scenario. During each time step, it counts how
many vehicles exceed a velocity threshold. After the simulation ends, the collected
statistics are saved to the MATLAB workspace for analysis.
classdef mySysObserver < matlab.System

    properties(Access=private)
         mScenarioSimObj;
         mScenarioSimActorList = [];
         velThreshold = 15;  % Set threshold velocity
         y = [];
    end

    methods(Access = protected)

       function setupImpl(obj)
           obj.mScenarioSimObj = Simulink.ScenarioSimulation.find("ScenarioSimulation", ...
           "SystemObject", obj);
           obj.mScenarioSimActorList = obj.mScenarioSimObj.get("ActorSimulation");
           % Get list of all actors
       end

       function stepImpl(obj)
           count = 0;
           for i = 1:length(obj.mScenarioSimActorList)
               vel = norm(getAttribute(obj.mScenarioSimActorList{i},"Velocity"));
               if(vel > obj.velThreshold)
                 count = count + 1;
                 % Number of vehicles driving above threshold velocity
                 % in every time step
               end
           end
           obj.y = [obj.y,count];
           % Array with count value across all time steps
       end

       function releaseImpl(obj)
           assignin('base','NumberofVehiclesOverThreshold', obj.y);
           % Final array assigned to workspace variable
       end
    end
end
Author Observer in Simulink
This example shows the mySysObserver
Simulink model that represents an observer to view the number of vehicles in
the scenario crossing a specified threshold velocity. This Simulink model uses the System object code authored in MATLAB from the previous section and creates a Simulink block that replicates the function using the MATLAB
System block. Alternatively, you can use other Simulink blocks or the MATLAB Function block to replicate the
logic in the model.
Add MATLAB or Simulink Observers to RoadRunner Scenario
After authoring the observer as a MATLAB System Object or a Simulink model, add it to the RoadRunner scenario using the addObserver function.
observer = addObserver(ss,"velThreshold","mySysObserver")
Here, you are adding the MATLAB
System object in the file
mySysObserver as an observer named
velThreshold to a simulation named
ss.
Author RoadRunner Actor Behavior Using MATLAB System Objects or Simulink Models
You can define custom behaviors for your actors in RoadRunner scenario and control how actors move and respond during simulation. You can author behaviors in MATLAB using a System object, or in Simulink using models. Compared to observers, actor behaviors provide full control over actor motion and access to runtime attributes.
The following sections summarize the key steps involved in authoring, configuring, and simulating actor behaviors in RoadRunner, with additional guidance for handling messages in Simulink.
Author Actor Behavior in MATLAB
This example shows the hVehicle.m behavior that is created as a
MATLAB
System object file. In this behavior,
the code reads the initial pose and velocity of an actor and updates the values to
make the actor follow a lane. For more information about creating actor behaviors
using MATLAB, see Simulate RoadRunner Scenarios with Actors Modeled in MATLAB.
classdef hVehicle < matlab.System

    % Copyright 2021 The MathWorks, Inc.
    properties (Access = private)
        mActorSimulationHdl;
        mScenarioSimulationHdl;
        mActor;
        mLastTime = 0;
    end

    methods (Access=protected)
        function sz = getOutputSizeImpl(~)
            sz = [1 1];
        end

        function st = getSampleTimeImpl(obj)
            st = createSampleTime( ...
                obj, 'Type', 'Discrete', 'SampleTime', 0.02);
        end

        function t = getOutputDataTypeImpl(~)
            t = "double";
        end

        function resetImpl(~)
        end

        function setupImpl(obj)

            obj.mScenarioSimulationHdl = ...
                Simulink.ScenarioSimulation.find( ...
                    'ScenarioSimulation', 'SystemObject', obj);

            obj.mActorSimulationHdl = Simulink.ScenarioSimulation.find( ...
                'ActorSimulation', 'SystemObject', obj);

            obj.mActor.pose = ...
                obj.mActorSimulationHdl.getAttribute('Pose');

            obj.mActor.velocity = ...
                obj.mActorSimulationHdl.getAttribute('Velocity');

        end

        function stepImpl(obj, ~)

            currentTime = obj.getCurrentTime;
            elapsedTime = currentTime - obj.mLastTime;
            obj.mLastTime = currentTime;

            velocity = obj.mActor.velocity;
            pose = obj.mActor.pose;

            pose(1,4) = pose(1,4) + velocity(1) * elapsedTime; % x
            pose(2,4) = pose(2,4) + velocity(2) * elapsedTime; % y
            pose(3,4) = pose(3,4) + velocity(3) * elapsedTime; % z

            obj.mActor.pose = pose;


            obj.mActorSimulationHdl.setAttribute('Pose', pose);

        end

        function releaseImpl(~)
        end
    end
end
Author Actor Behavior in Simulink
For example, this model SimulinkVehicle.slx is created using
Simulink and RoadRunner scenario blocks from the Automated Driving Toolbox library. The model reads the actor data, increases its velocity, and
then writes the data back to the actor in RoadRunner scenario. For more information about creating Simulink behaviors for RoadRunner, see Simulate RoadRunner Scenarios with Actors Modeled in Simulink.
Handle RoadRunner Scenario Actor Messages in Simulink
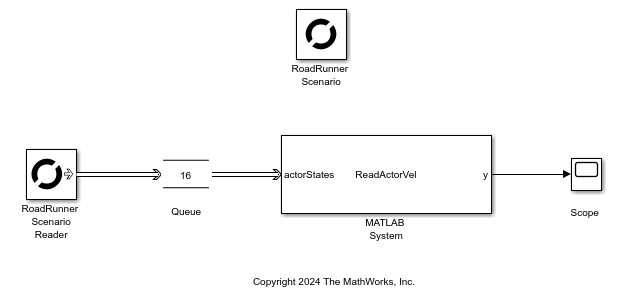
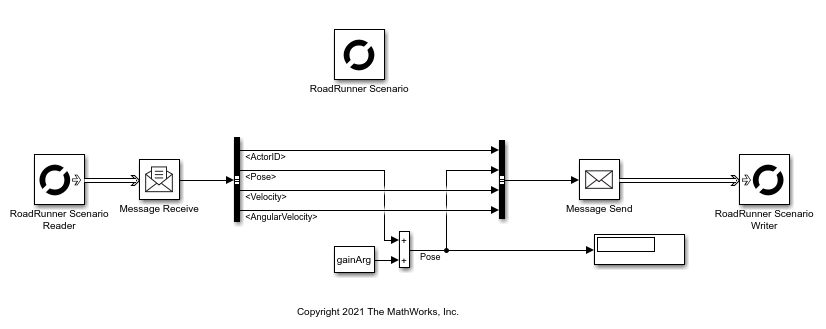
RoadRunner Scenario communicates actor data to Simulink using messages, which differ from traditional signals. RoadRunner Scenario Reader block reads these messages from the scenario and makes them available in the model. Depending on the type and the number of messages received in a single time step, you must use downstream processing blocks to ensure all the incoming data is correctly handled at each time step. This table illustrates the message types that you can read from the RoadRunner Scenario Reader block, the number of messages received per simulation time step, and the appropriate downstream Simulink blocks to use for processing those messages.
| Message Type | Messages Received Per Time Step | Recommended Processing Block | Iteration Logic for Multiple Messages |
|---|---|---|---|
| All Actor States | Multiple | Queue (Simulink) |
|
| Sensor, Action and Single Actor States | Single | Message Receive (Simulink) | Not required |
Associate Actor Behavior in RoadRunner Scenario
This section describes how to associate a custom behavior to your actors in RoadRunner. The workflow is the same for MATLAB and Simulink behaviors.
In your RoadRunner scenario, select the Library Browser and then the
Behaviorsfolder.To create a new behavior, right-click an empty space in the list of behaviors, pause on New, then select Behavior. Enter a name for your new behavior, such as
MyNewBehavior.On the Attributes pane, set Platform to
MATLAB/Simulink. As the File Name, use the location of your filehVehicle.morSimulinkVehicle.slx, depending on whether you are using the System object or the Simulink model.This action creates a new behavior that you can attach to actors in your scenario. Rename the behavior as
MyNewBehavior.Add a new
CompactCarto your scenarioMyExampleScenario.To associate the new behavior to an actor, select
CompactCar. On the Attributes pane, in the Behavior box, addMyNewBehaviortoCompactCarby clicking and dragging the behavior icon to the box.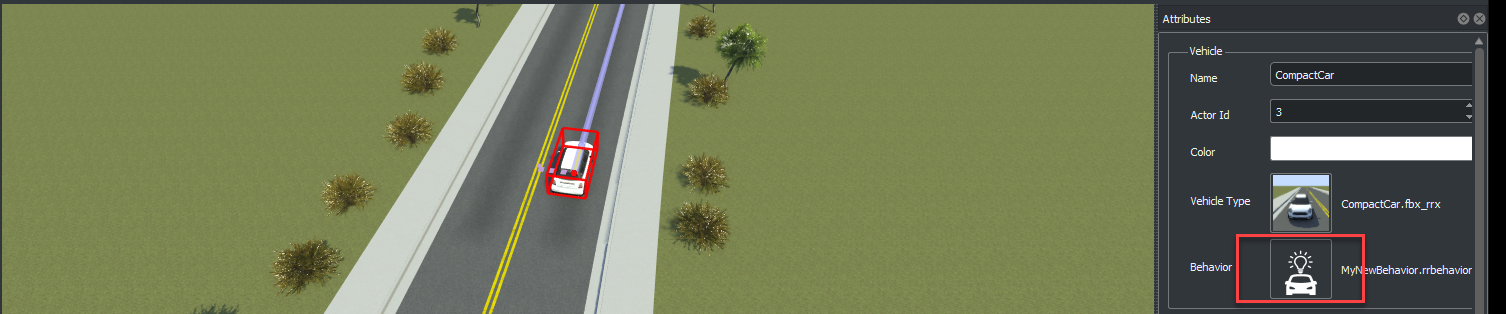
Publish Actor Behavior
After you create your custom behavior, you can attach your behavior to actors in
your scenario. Optionally, you can publish your actor behaviors as proto files or
packages using the Simulink.publish.publishActorBehavior() and
Simulink.publish.publishActor() functions.
Proto files are specific to RoadRunner and have a .slprotodata extension. This data
interface allows you to combine your behavior model, its parameters, and their
values and share them with RoadRunner.
You can also publish your behavior as a package in a .zip file.
Publishing in a .zip file will allow you to create a package that
includes the proto file along with other supporting files for your model.
For more information on the behavior publishing workflow, see Publish Actor Behavior as Proto File, Package, Action Asset or Event Asset.
Tune Actor Parameters
You can tune the parameters you define in your custom MATLAB and Simulink behaviors directly within RoadRunner using any of these two methods:
Use published proto file for the behavior
Use associated behavior directly without publishing
Tune Parameters Using Published Proto File in RoadRunner
You can tune parameters for your behavior within RoadRunner by publishing a proto file corresponding to your behavior. The published proto file has the model, its parameters, and the values. For more information see, Publish Actor Behavior as Proto File, Package, Action Asset or Event Asset.
After publishing the proto file, follow these steps:
Publish your model (e.g.,
foo01.slx) as a proto file (foo01.slprotodata) using publishing functions.Drag the proto file into a folder under
MyProject/Assetsin RoadRunner.Double-click the behavior to view its parameters (e.g.,
gain01). This view is read-only.Attach the proto file to a vehicle in your scenario.
Select the action phase for the vehicle and click Add Action. Then, select
Change Behavior Parameter.The parameter (e.g.,
gain01) becomes available for tuning during simulation.
Tune Parameters of Model Associated as Behavior without Publishing
You can also tune parameters for your behavior within RoadRunner without publishing a proto file. To do so, you create a new behavior
then add a new parameter to your behavior with a name that is identical to the
parameter gain01. Then, you can tune the parameter without any
additional steps.
Create a new behavior and add it to RoadRunner using the steps outlined in the previous section.
In the attributes pane, select Add Parameter.
Create the parameter that has the same name as the behavior parameter (e.g.,
gain01).The remainder of the workflow is the same as when you publish your file. Attach the behavior to your vehicle, and from the action phase, tune the parameter for your simulations.
Simulate Scenario from RoadRunner
You can Use the Scenario Editor in RoadRunner to simulate your scenario with the custom behavior and control the progression of the simulation and perform start, pause, step, continue, stop actions.
To support the simulation of a custom behaviors defined as a Simulink model or MATLAB System object, you need to configure RoadRunner so that it can find an installation of MATLAB that is available on your computer.
To configure the file:
Open the
SimulationConfiguration.xmlfile that is generated with your RoadRunner installation. For more information, see Simulation Configuration (RoadRunner Scenario).In the file, search for the configuration related to MATLAB platform (see the example below).
        <Platform name="MATLAB">
            <ExecutablePath>C:\Program Files\MATLAB\R2022a\matlab\bin\matlab.exe</ExecutablePath>
            <StartTimeOut>60000</StartTimeOut>
            <NoDesktop>true</NoDesktop>
        </Platform>
Replace the full path to the MATLAB executable (denoted by the
<ExecutablePath>tag) with the installed executable on your computer.
You can also control the pace of the simulation and the simulation step size and observe the current simulation time during simulation.

Control RoadRunner Scenario Simulation Using MATLAB
Instead of using the Scenario Editor in RoadRunner you can also use MATLAB to control your simulations.
Use the object functions of
roadrunnerto start RoadRunner and RoadRunner Scenario.Use the
openScenarioandsaveScenariofunctions to load and save a pre-defined scenario file (.rrScenario).Configure and manage a simulation. For more information, see
ScenarioSimulation.From MATLAB, prepare a simulation by getting or setting simulation step size and simulation pace.
Use MATLAB to control the simulation and to start, stop, pause, resume, and single-step.
Get the current playback status.
Use MATLAB functions, and MATLAB System objects.
Use the
ActorModelobject to read actor static specifications or scenario logic models.Use the
ActorSimulationobject to read and write runtime values such as actor runtime attributes.Use the
ScenarioSimulationobject to report or be notified of simulation results and diagnostics such as warnings and errors, or receive and send scenario logic events.
This example shows how to simulate a scenario using MATLAB code. After each step, wait for the expected response from RoadRunner or MATLAB before proceeding to next steps.
Start the RoadRunner application interactively by using the
roadrunnerSetupfunction. When the function opens a dialog box, specify the RoadRunner Project Folder and RoadRunner Installation Folder locations.rrApp = roadrunnerSetup;
Note
Specify the full path to the folder containing the
AppRoadRunner.exeexecutable. The default location of this executable on Windows® isC:\Program Files\RoadRunner R2022b\bin\win64, whereC:\Program Files\RoadRunner R2022bis your RoadRunner installation folder. The folder could be different on your computer.To open the RoadRunner project
MyRoadRunnerProjectfrom MATLAB, use this command.rrApp = roadrunner('MyProjectLocation');Open the scene
MyExampleScene.openScene(rrApp, 'MyExampleScene');Open the scenario
MyExampleScenario.openScenario(rrApp, 'MyExampleScenario');Get the simulation object to control simulation from MATLAB.
rrSim = createSimulation(rrApp);
Start the simulation from the command line.
set(rrSim, 'SimulationCommand','Start');
Tip
When debugging cosimulations using the MATLAB or Simulink debugger, the simulation might time out. Check the simulation timeout setting using this code.
s = settings;
s.roadrunner.application.Timeout.ActiveValue
s = settings;
s.roadrunner.application.Timeout.TemporaryValue = 600;
If the simulation times out, the current ScenarioSimulation object becomes
invalid. If the ScenarioSimulation object is invalid, RoadRunner generates an error if you attempt to start the simulation. To restart
the simulation, delete the ScenarioSimulation object and recreate
it using this code. Replace rrSim with the name of your
ScenarioSimulation object and rrApp
with the name of your roadrunner
object.
delete(rrSim)
rrSim = createSimulation(rrApp);
If a simulation is unresponsive, you can end the simulation by pressing Ctrl+C in the MATLAB Command Window.
Start Simulation of RoadRunner Scenario Interactively from Simulink Actor Behavior Model
You can start the simulation of a RoadRunner scenario interactively from a Simulink actor behavior model. To do so, first specify the necessary block parameters such as the scenario filename and actor ID in the Scenario tab of the RoadRunner Scenario block, and then simulate the model. When you simulate the model, Simulink automatically launches the specified scenario in a new RoadRunner Scenario window and attaches the Simulink behavior to the specified actor for the duration of the simulation. For more information, see Start Simulation of RoadRunner Scenario Interactively from Simulink Actor Behavior Model.
Note
Tuning of model parameters is not supported when you start the simulation of a RoadRunner scenario interactively from a Simulink actor behavior model.
Inspect Simulation Results Using Data Logging
You can inspect simulation results using data logging. This example code logs the
simulation data, runs the simulation, and then gets the logged simulation data. For more
information about logging, see ScenarioLog.
% Turn logging on
set(rrSim, 'Logging', 'On')

% Run simulation
set(rrSim, 'SimulationCommand', 'Start')

% Get logged simulation data
simLog = get(rrSim, 'SimulationLog');
Controlling scenario simulation using MATLAB and inspecting results using data logging assumes that you manually open a MATLAB session to control your simulation. If there is not any active MATLAB session connected to RoadRunner prior to the start of the simulation, RoadRunner automatically opens a MATLAB session to simulate the scenario with MATLAB or Simulink actors.
To enable this, configure the Simulation Configuration (RoadRunner Scenario) by setting the ExecutablePath parameter to MATLAB executable and setting the StartTimeOut parameter properly before starting RoadRunner.
See Also
RoadRunner Scenario | RoadRunner Scenario Reader | RoadRunner Scenario Writer
Topics
- Simulate RoadRunner Scenarios with Actors Modeled in Simulink
- Simulate RoadRunner Scenarios with Actors Modeled in MATLAB
- Add Sensors to RoadRunner Scenario Using Simulink
- Add Sensors to RoadRunner Scenario Using MATLAB
- Publish Actor Behavior as Proto File, Package, Action Asset or Event Asset
- Publish Ground Truth and Sensor Data from RoadRunner Scenario to ROS 2 Network (ROS Toolbox)